
Livestreaming meetings or webinars on YouTube
You can live stream Zoom Meetings or Zoom Webinars on YouTube. This allows participants to join your meeting via Zoom to view it and comment on it through YouTube. During the live event, there will be an approximate 20-second delay between the actual Zoom Meetings or Zoom Webinars and the live stream.
Note: Those viewing on YouTube can only comment through YouTube, and can not interact directly with other webinar attendees, the same goes for webinar attendees as well.
Note: Those viewing on YouTube can only comment through YouTube, and can not interact directly with other webinar attendees, the same goes for webinar attendees as well.
This article covers:
- How to enable YouTube live streaming for meetings
- How to enable YouTube live streaming for webinars
- How to start a live stream to YouTube
Prerequisites for Streaming a Zoom Meeting
- Pro, Business, Education, or Enterprise account
- The host is Licensed
- Zoom desktop client:
- Windows: version 4.4.53582 or higher
- macOS: version 4.4.53582 or higher
- Zoom mobile client
- Android: version 5.4.0 or higher
- iOS: version 5.4.0 or higher
- Live streaming is enabled on YouTube
Prerequisites for Streaming Zoom Webinars
- Pro, Business, Education, or Enterprise account
- The host is assigned a Zoom Webinars license
- Zoom desktop client:
- Windows: version 4.0 or higher
- macOS: version 4.0 or higher
- Zoom mobile client
- Android: version 5.4.0 or higher
- iOS: version 5.4.0 or higher
- Live streaming enabled on YouTube
How to enable or disable YouTube live streaming for meetings
Account
To enable Allow livestreaming of meetings on YouTube for all users in the account:
- Sign in to the Zoom web portal as an admin with the privilege to edit account settings.
- In the navigation menu, click Account Management then Account Settings.
- Click the Meeting tab.
- Under In Meeting (Advanced), click the Allow livestreaming of meetings toggle to enable it.
- If a verification dialog appears, click Enable verify the change.
- Select the check box next to YouTube.
- Click Save.
- (Optional) If you want to make this setting mandatory for all users in your account, click the lock icon
 , and then click Lock to confirm the setting.
Group
Note: If you signed up for a new Zoom account after August 21, 2021; or the New Admin Experience is enabled on your account, the Group Management page has been renamed to Groups.
To enable Allow livestreaming of meetings on YouTube for a group of users:
- Sign in to the Zoom web portal as an administrator with the privilege to edit groups.
- In the navigation menu, click User Management then Group Management.
- Click the applicable group name from the list.
- Click the Meeting tab.
- Under In Meeting (Advanced), click the Allow livestreaming of meetings toggle to enable it.
- If a verification dialog appears, click Enable verify the change.
Note: If the option is grayed out, it has been locked at the account level and needs to be changed at that level. - Select the check box next to YouTube.
- Click Save.
- (Optional) If you want to make this setting mandatory for all users in this group, click the lock icon , and then click Lock to confirm the setting.
User
To enable Allow livestreaming of meetings on YouTube for your own use:
- Sign in to the Zoom web portal.
- In the navigation menu, click Settings.
- Click the Meeting tab.
- Under In Meeting (Advanced), click the Allow livestreaming of meetings toggle to enable it.
- If a verification dialog appears, click Enable verify the change.
- Select the check box next to YouTube.
- Click Save.
Note: If the option is grayed out, it has been locked at either the group or account level, and you will need to contact your Zoom administrator to make changes.
How to enable YouTube live streaming for webinars
Account
To enable Allow livestreaming of webinars on YouTube for all users in the account:
- Sign in to the Zoom web portal as an admin with the privilege to edit account settings.
- In the navigation menu, click Account Management then Account Settings.
- Click the Meeting tab.
- Under In Meeting (Advanced), click the Allow livestreaming of webinars toggle to enable it.
- If a verification dialog appears, click Enable verify the change.
- Select the check box next to YouTube.
- Click Save.
- (Optional) If you want to make this setting mandatory for all users in your account, click the lock icon , and then click Lock to confirm the setting.
Group
Note: If you signed up for a new Zoom account after August 21, 2021; or theNew Admin Experience is enabled on your account, the Group Management page has been renamed to Groups.
To enable Allow livestreaming of webinars on YouTube for a group of users:
- Sign in to the Zoom web portal as an administrator with the privilege to edit groups.
- In the navigation menu, click User Management then Group Management.
- Click the applicable group name from the list.
- Click the Meeting tab.
- Under In Meeting (Advanced), click the Allow livestreaming of webinars toggle to enable it.
- If a verification dialog appears, click Enable verify the change.
Note: If the option is grayed out, it has been locked at the account level and needs to be changed at that level. - Select the check box next to YouTube.
- Click Save.
- (Optional) If you want to make this setting mandatory for all users in this group, click the lock icon , and then click Lock to confirm the setting.
User
To enable Allow livestreaming of webinars on YouTube for your own use:
- Sign in to the Zoom web portal.
- In the navigation menu, click Settings.
- Click the Meeting tab.
- Under In Meeting (Advanced), click the Allow livestreaming of webinars toggle to enable it.
- If a verification dialog appears, click Enable verify the change.
- Select the check box next to YouTube.
- Click Save.
Note: If the option is grayed out, it has been locked at either the group or account level, and you will need to contact your Zoom administrator to make changes.
How to start a live stream to YouTube
 Windows |
  macOS
macOSLive stream in a meeting or webinar from your desktop
- Start the webinar or meeting as the host.
- In the meeting or webinar controls at the bottom of your screen, click More.
- Click Live on YouTube.
- Log in to YouTube and select the YouTube channel you want to stream to (if you have multiple channels).
After you authenticate successfully, the following page appears: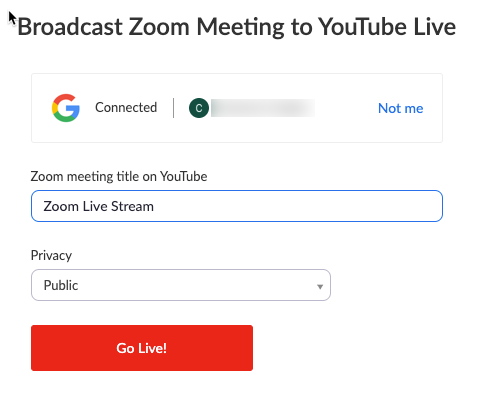
- Specify the following settings on the Broadcasting to YouTube Live page:
- Zoom meeting/webinar title on YouTube
Automatically populated with the Zoom meeting or webinar topic. Navigate to the text box to change it. - Privacy
You can choose Public, Unlisted, or Private.
- Zoom meeting/webinar title on YouTube
- Click the Go Live! button.
You will see a progress bar letting you know that your session is being prepared for streaming. - Wait for the notification from the Zoom client that your meeting or webinar is live on YouTube, then begin your meeting or webinar.
Streaming stops when you end the webinar or meeting, or click More then Stop Live Stream in the meeting/webinar controls.
Live stream a meeting or webinar to a YouTube Event
- Enable Custom Live Streaming for your meeting or webinar.
- Schedule your meeting or webinar.
- Scroll to the bottom of the page and click Configure live stream settings in the Live Streaming section.
- Open a new browser tab and sign in to your YouTube account.
- Click the Create a Video icon and select Go Live.

- When asked if you want to live stream right now or at a later date, select Start in the Later Date section.
- When asked what type of stream, select Go in the Streaming software section.
- Click the SCHEDULE STREAM option in the top-right corner of the page.
- If you have previously scheduled such an event, you can select that event and reuse settings from that session. Otherwise, select Create New.
- Enter the required information, such as title privacy setting, description, category, date/time, whether this is made for children or not, and any age restriction.
- Click Create Stream.
- Copy and paste the Server URL and Stream Key from the Stream Settings section into the Stream URL and Stream Key on Zoom.

- Click the share arrow to access the Video Link. Copy and paste that into the Live streaming page URL on Zoom.

- Click Save on the Zoom page.

- When you are ready to begin the event, start your Zoom meeting or webinar as the host.
- Click More in the meeting controls.
- Click Live on Custom Live Streaming Service.

- Once Zoom has started the live stream, back in the YouTube stream event click Go Live.
 Android |
 Live stream in a meeting or webinar from your mobile device
- Start the webinar or meeting as the host.
- Tap More in the meeting/webinar controls.
- Tap YouTube.
This will launch your browser and ask you to log in to YouTube. - Select the YouTube channel you wish to stream to (if you have multiple channels).
- After you authenticate successfully, you will be allowed to specify the following settings on the Broadcasting to YouTube Live page:
- Zoom Meeting title on YouTube
Automatically populated with the Zoom Webinars topic. Navigate to the text box to change it. - Privacy
You can choose Public, Unlisted, or Private.
- Zoom Meeting title on YouTube
- Click the Go Live! button.
You will now see a progress bar, letting you know that your session is being prepared for streaming. The live stream will then begin and be shown. - Return to the Zoom app to continue the meeting or webinar.
- Streaming stops when you end the webinar or meeting, or click the LIVE notification in the top-left corner of the meeting/webinar window, tap Stop Live Stream, then confirm by tapping Stop Live Stream again.